I finally started playing around with Microsoft Nano Server this past week and am quite amazed at the implementation of this new Windows Server deployment option. The potential is incredible and I am sure there are going to be many hosting providers and enterprises looking at this new option very closely.
There is much to learn listening to the Virtual Academy A Deep Dive into Nano Server training but in short a few of the main points:
- 64-bit only
- Deployment speed and footprint
- Headless and managed via PowerShell or other remote tools (Eg. Server Manager, Cluster Manager, Hyper-V Manager)
- Support for only the necessary core OS services
- Use cases
- Scale-Out File Servers
- Hyper-V (Physical only)
- Containers
- Physical or virtualized deployment
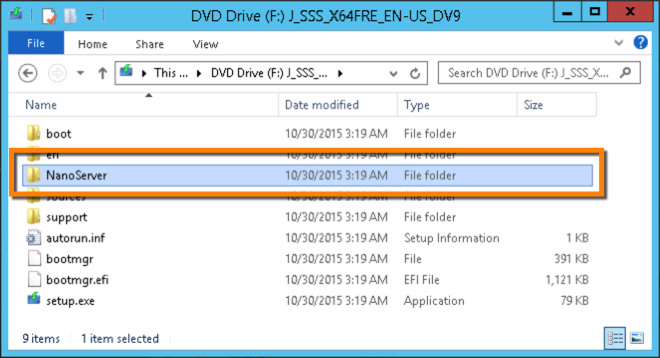
With Microsoft Windows Server 2016 (Technical Preview 4) a new module is provided to automate the Nano Server image creation. Nano Server comes as part of the Windows Server preview ISO image. Once you have Technical Preview 4 download, all that needs to be done is to mount the ISO and you will see the NanoServer folder such as below.
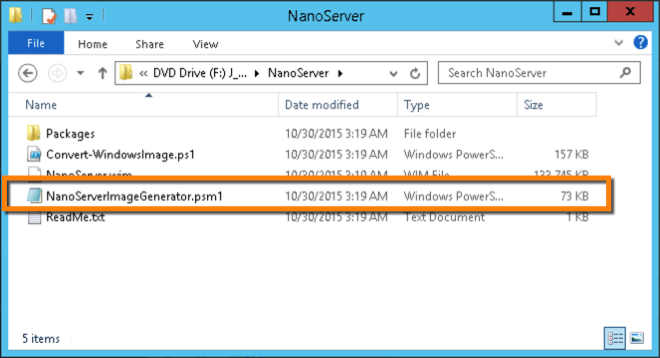
This second screenshot shows the new NanoServerImageGenerator Module (.psm1). This can be loaded directly from the ISO (which is the method I used) or can be copied locally. The Convert-WindowsImage.ps1 file is used by the new module to assist with the creation of the Nano Server virtual machine.
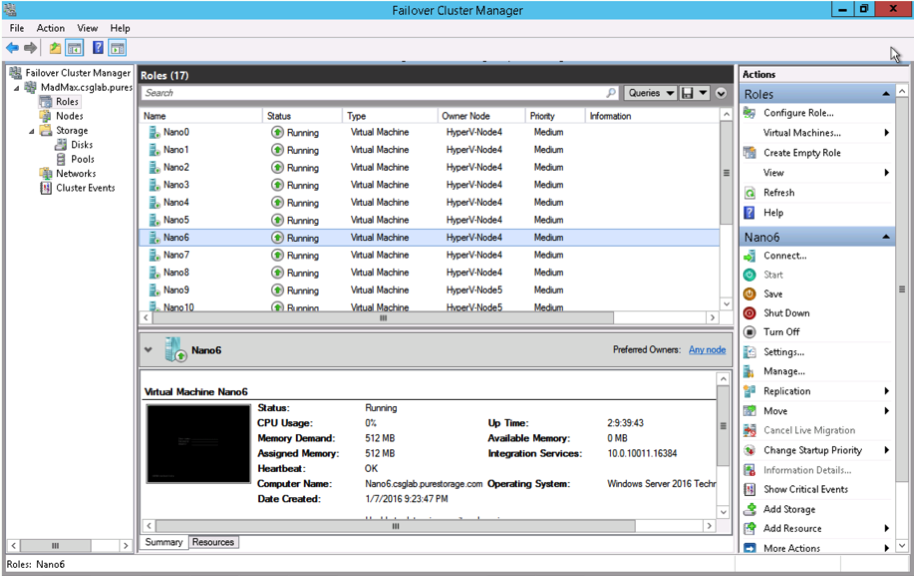
The 16 node cluster I created has the Storage (File Services, Storage Spaces), Compute (Hyper-V, Clustering (Failover), -GuestDrivers (used for virtualization) and Containers packages. Even though I included Compute in this example I cannot use it because I’m implementing Nano Server as a virtualized instance, as you probably noticed above the Compute (Hyper-V) can only be used on physical hosts but I just included as part of my general deployment testing.
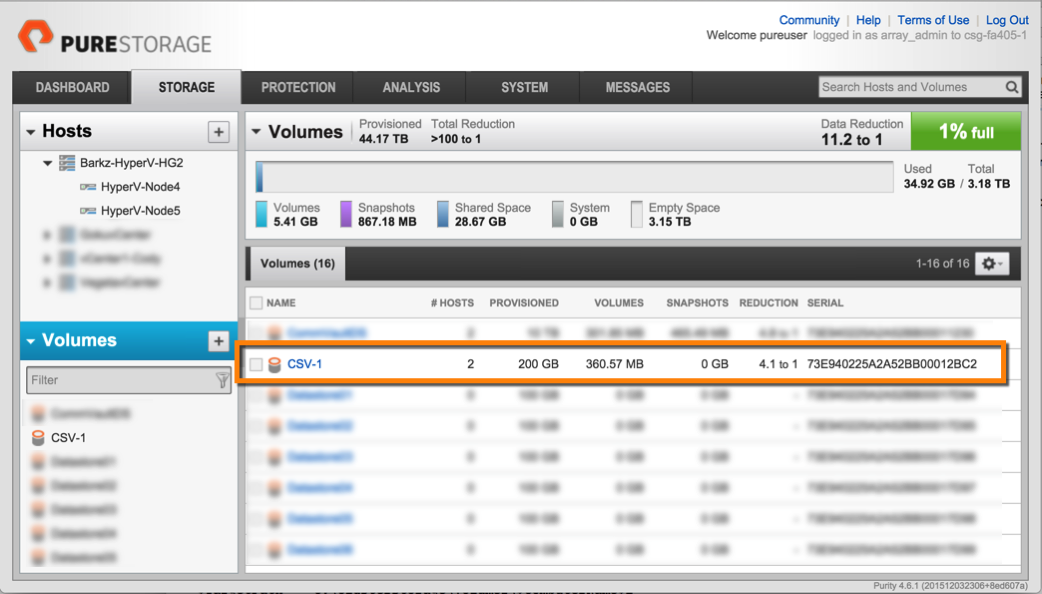
My initial focus is just on scaling a deployment of a 16 node virtual cluster. The 16 nodes are spread across 2 physical hosts that are connected to a Pure Storage FA-405 running Purity 4.6. The 2 hosts are running Windows Server 2012 R2 Update with Failover Clustering. There is one 200GB Clustered Shared Volume (CSV) that was used to deploy the Nano virtual instances, 8 to each node.
All 16 nodes take up just 360.57 MB of space, this is one of the main points I listed above for deployment size. Each of the nodes (virtual machines) were created from scratch vs using any snapshot techniques.
All 16 virtual machines deployed in 30 minutes fully configured. This hits another point about speed of deployment. Each of the virtual instances was set with the following:
- Joined to a domain
- Assigned IPv4 address
- Set the administrator password
- Added Nano Server packages
Here is a view of the Nano10 virtual machine with the emergency mode login screen. Remember that training I mentioned, be sure to check that out.
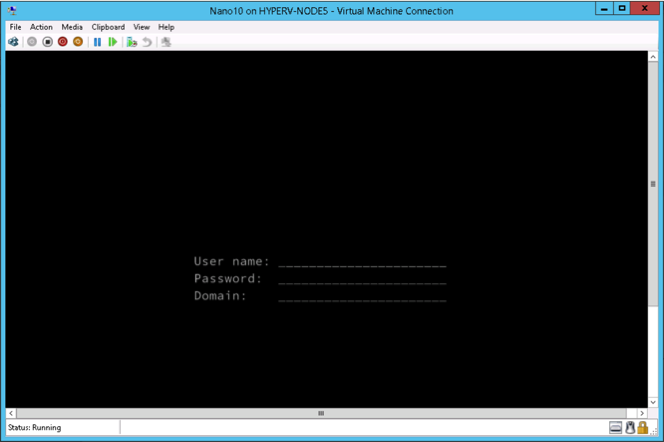
Over the next few weeks I’ll be spending more time discussing the remote management and setup of the Storage component to test some basic file server services.
Below is the script and sample output. Once the NewNanoServerImageGenerator module has been imported use the New-NanoServerImage cmdlet. Take notice of the [ ` ] (tick-marks) in the example script. The new cmdlet can be quite lengthy on one single line so for easier reading I used the [ ` ] to structure the line.
Windows PowerShell
$ClusterSize = 16
$ComputerName = 'Nano'
$BasePassword = 'xxxxxxxx'
$IpAddress=@(
'10.21.8.200','10.21.8.201','10.21.8.202','10.21.8.203',
'10.21.8.204','10.21.8.205','10.21.8.206','10.21.8.207',
'10.21.8.208','10.21.8.209','10.21.8.210','10.21.8.211',
'10.21.8.212','10.21.8.213','10.21.8.214','10.21.8.215')
$DomainName = 'csglab.purestorage.com'
"Start Time: $(Get-Date -Format hh:mm:ss)"
For($i=0; $i -le $ClusterSize; $i++) {
  New-Item "C:\ClusterStorage\Volume2\$ComputerName$i" -ItemType Directory -Force
  $TargetPath = "C:\ClusterStorage\Volume2\$ComputerName$i"
  New-NanoServerImage -MediaPath F:\ `
    -TargetPath "C:\ClusterStorage\Volume2\$ComputerName$i\$ComputerName$i.vhdx" `
    -Storage -Compute -Clustering -GuestDrivers -Containers `
    -ComputerName $ComputerName$i `
    -AdministratorPassword($BasePassword | ConvertTo-SecureString -AsPlainText -Force) `
    -DomainName $DomainName `
    -Ipv4Address $IpAddress[$i-1]
  $VHDXPath = "C:\ClusterStorage\Volume2\$ComputerName$i\$ComputerName$i.vhdx"
  $VMSwitch = "Pure Storage vSwitch"
  New-VM -Name $ComputerName$i -Path "C:\ClusterStorage\Volume2\$ComputerName$i" `
    -BootDevice VHD `
    -Generation 2 `
    -Memory 512MB `
    –SwitchName $VMSwitch `
    -VHDPath $VHDXPath
  Set-VM –Name $ComputerName$i –AutomaticStartAction Start
  Start-VM -Name $ComputerName$i
  Add-ClusterVirtualMachineRole -VirtualMachine $ComputerName$i
}
"End Time: $(Get-Date -Format hh:mm:ss)"
Below is the output from the above Windows PowerShell. I only included the Nano0 and Nano15 output examples. Notice the Start Time = 9:11 and the End Time = 9:41.
Start Time: 09:11:30
 Directory: C:\ClusterStorage\Volume2
Mode LastWriteTime Length Name
---- ------------- ------ ----
d---- 1/7/2016 9:11 PM Nano0
Windows(R) Image to Virtual Hard Disk Converter for Windows(R) 10
Copyright (C) Microsoft Corporation. All rights reserved.
Version 10.0.10586.0.amd64fre.th2_release.151029-1700
INFO : Looking for the requested Windows image in the WIM file
INFO : Image 1 selected (ServerTuva)...
INFO : Creating sparse disk...
INFO : Mounting VHDX...
INFO : Initializing disk...
INFO : Creating EFI system partition (ESP)...
INFO : Formatting ESP...
INFO : Creating MSR partition...
INFO : Creating windows partition...
INFO : Formatting windows volume...
INFO : Windows path (H:) has been assigned.
INFO : System volume location: G:
INFO : Applying image to VHDX. This could take a while...
INFO : Image was applied successfully.
INFO : Making image bootable...
INFO : Drive is bootable. Cleaning up...
INFO : Dismounting VHDX...
INFO : Deleting pre-existing VHDX : NanoServerImageGenerator.vhdx...
INFO : Closing Windows image...
INFO : Done.
Done. The log is at: C:\Users\ADMINI~1.CSG\AppData\Local\Temp\2\NanoServerImageGenerator.log
Name : Nano0
State : Off
CpuUsage : 0
MemoryAssigned : 0
MemoryDemand : 0
MemoryStatus :
Uptime : 00:00:00
Status : Operating normally
ReplicationState : Disabled
Generation : 2
Name : Nano0
OwnerNode : HyperV-Node4
State : Online
<<Nano1-15 Processing Removed>>
d---- 1/7/2016 9:39 PM Nano16
Windows(R) Image to Virtual Hard Disk Converter for Windows(R) 10
Copyright (C) Microsoft Corporation. All rights reserved.
Version 10.0.10586.0.amd64fre.th2_release.151029-1700
INFO : Looking for the requested Windows image in the WIM file
INFO : Image 1 selected (ServerTuva)...
INFO : Creating sparse disk...
INFO : Mounting VHDX...
INFO : Initializing disk...
INFO : Creating EFI system partition (ESP)...
INFO : Formatting ESP...
INFO : Creating MSR partition...
INFO : Creating windows partition...
INFO : Formatting windows volume...
INFO : Windows path (H:) has been assigned.
INFO : System volume location: G:
INFO : Applying image to VHDX. This could take a while...
INFO : Image was applied successfully.
INFO : Making image bootable...
INFO : Drive is bootable. Cleaning up...
INFO : Dismounting VHDX...
INFO : Deleting pre-existing VHDX : NanoServerImageGenerator.vhdx...
INFO : Closing Windows image...
INFO : Done.
Done. The log is at: C:\Users\ADMINI~1.CSG\AppData\Local\Temp\2\NanoServerImageGenerator.log
Name : Nano16
State : Off
CpuUsage : 0
MemoryAssigned : 0
MemoryDemand : 0
MemoryStatus :
Uptime : 00:00:00
Status : Operating normally
ReplicationState : Disabled
Generation : 2
Name : Nano16
OwnerNode : HyperV-Node4
State : Online
End Time: 09:41:43
In this blog I have just started scratching the surface with Nano Server and the different packages and capabilities. Exciting times! Thank you Jeffrey Snover for your continued innovation of the Microsoft Windows platform.
References
- Microsoft Virtual Academy — A Deep Dive into Nano Server
- Getting Started with Nano Server
Thanks,
Barkz