After a brief hiatus I’m back and to start things off I wanted to share an example of how to use the new REST API we have created as part of our Purity Operating Environment. The implementation of the REST API provides a simple interface for many of the Purity commands available via the CLI. This may be common knowledge but I wanted to make sure we are all on the same page and understand what REST is before diving into details. REST standards for REpresentational State Transfer (REST) uses HTTP requests to interact with resources within Pure Storage. REST is an architectural style that describes the following constraints:
- Uniform Interface. Individual resources are identified in requests using URIs as resource identifiers. For example:
volume
volume/v1
Clients manipulate resources through request methods, such as:
Method Description Example GET List resources. GET volumePOST Create a resource. POST volume/v1PUT Modify a resource. PUT volume/v1DELETE Delete a resource. DELETE volume/v1
Requests can include additional parameters, either in the URL or as JSON post data. For example, the snap query parameter is included in the following request to list all snapshots:
GET volume?snap=true
Responses return a response code and data (represented in JSON). For example, the following GET volume/v1 request returns a response code200 OK and the attribute details for a volume named “v1”:
>> GET volume/v1
<< 200 OK
[
  {
    "created": "Tue Jan 28 06:15:23 2014",
    "name": "v1",
    "serial": "CEE061D3B3B23499000101E1",
    "size": 1073741824,
    "source": null
  }
]
- Stateless. The necessary state to handle a request is contained in the request itself.
- Cacheable. The responses must implicitly or explicitly define themselves as cacheable.
- Client-Server. The uniform interface creates separation between client and server. Clients can be more portable, severs do not need to know anything about user interface or state.
- Layered System. A client cannot tell if it is connected directly to the server; intermediary servers can be used to improve scalability or enforce security policies
The best thing about REST is that it is all about decoupling that tight link between clients and servers, for a full deep dive on REST read Roy T. Fielding’s doctoral dissertation.
The other great thing about REST is that you can call it from Windows PowerShell using the Invoke-RestMethod cmdlet in Windows PowerShell 4.0 (yep latest and greatest). The following PowerShell example is a good start at understanding how to work with our REST APIs. In my previous posts you will notice that I used the SSH-Sessions module to interact with our array by passing CLI commands to execute actions on our FlashArray, not anymore! Poohey on SSH from PowerShell (“not that there’s anything wrong with that” – Jerry Seinfeld).
The authentication model used is based on API tokens. We create an API token using POST auth/apitoken then use POST auth/session with the previously created token to access the FlashArray to perform further operations.
Clear-Host
[System.Net.ServicePointManager]::ServerCertificateValidationCallback = { $true }
$FlashArrayName = <NAME or IP Address>
$AuthAction = @{
    password = <Account Name>
    username = <Account Password>
}
Write-Host $AuthAction.Values
$ApiToken = Invoke-RestMethod -Method Post -Uri "https://${FlashArrayName}/api/1.1/auth/apitoken" -Body $AuthAction

$SessionAction = @{
    api_token = $ApiToken.api_token
}
Invoke-RestMethod -Method Post -Uri "https://${FlashArrayName}/api/1.1/auth/session" -Body $SessionAction -SessionVariable Session
Once we are authenticated and have a session established we store that session in the –SessionVariable so that subsequent calls can be issued without re-authentication.
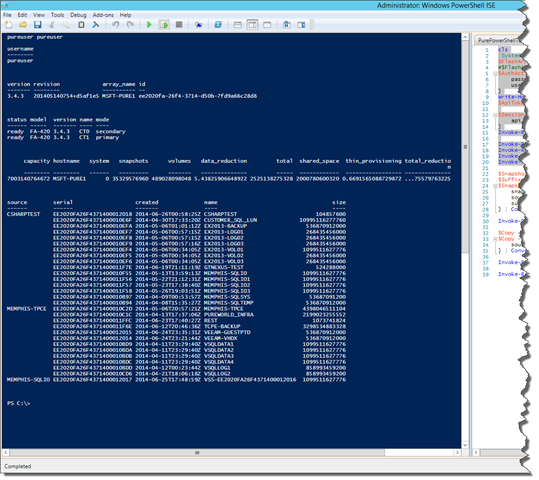
In this first post I am simply showing how to access array information, controllers, view space and volume details. Each of the Invoke-RestMethod calls passes into Format-Table –Autosize to display the information nicely.
Invoke-RestMethod -Method Get -Uri "https://${FlashArrayName}/api/1.1/array" -WebSession $Session | Format-Table -AutoSize
Invoke-RestMethod -Method Get -Uri "https://${FlashArrayName}/api/1.1/array?controllers=true" -WebSession $Session | Format-Table -AutoSize
Invoke-RestMethod -Method Get -Uri "https://${FlashArrayName}/api/1.1/array?space=true" -WebSession $Session | Format-Table -AutoSize
Invoke-RestMethod -Method Get -Uri "https://${FlashArrayName}/api/1.1/volume" -WebSession $Session | Format-Table -AutoSize
Whenever you are completed performing operations its time to cleanup, use –Method Delete to delete the session.
The results of all the above PowerShell Invoke-RestMethod calls will net the following output:
Next post will cover taking snapshots and creating new volume copies using the REST API with Invoke-RestMethod.
Thanks,
Barkz