The interest in the PowerShell Toolkit has grown over the last several months and I wanted to take a moment to provide some guidance on how to get started whether you are using Windows 7, Windows 8, Windows Server 2008 R2, or Windows Server 2012/R2.
The toolkit works with all of the versions of Windows I listed previously, but each of the versions listed has a different version of Windows PowerShell included in the base operating system. For example Windows 8 comes with Windows PowerShell 3.0 as the default version. To make things a bit easier I compiled the following table to provide some PowerShell version history, default Windows version and which version of Windows specific PowerShell versions work.
|
Version |
Released | Default Windows Version | Supported On |
| PowerShell 1.0 | November 2006 |
Windows Server 2008 |
Windows XP (SP2, SP3) Windows Server 2003 (SP1, SP2) Windows Server 2003 R2 Windows Vista (SP2) |
| PowerShell 2.0 Available in all newer Windows versions. |
October 2009 | Windows 7 Windows Server 2008 R2 |
|
| PowerShell 3.0 Windows Management Framework 3.0; backwardly compatible with PowerShell 2.0 |
September 2012 | Windows 7 Windows Server 2008 R2 Windows 8 Windows Server 2012 |
Windows XP (SP3) Windows Server 2003 (SP2) Windows Vista (SP1, SP2) Windows Server 2008 (SP1, SP2) |
| PowerShell 4.0 Windows Management Framework 4.0; backwardly compatible with PowerShell 2.0, 3.0 |
October 2013 | Windows 8.1 Windows Server 2012 R2 |
Windows 7 (SP1) Windows Server 2008 R2 (SP1) Windows Server 2012 |
| PowerShell 5.0 Windows Management Framework 5.0; backwardly compatible with PowerShell 2.0, 3.0, 4.0 |
Latest Preview November 2014 |
“Windows 10” | Windows 8.1 Windows Server 2012 R2 |
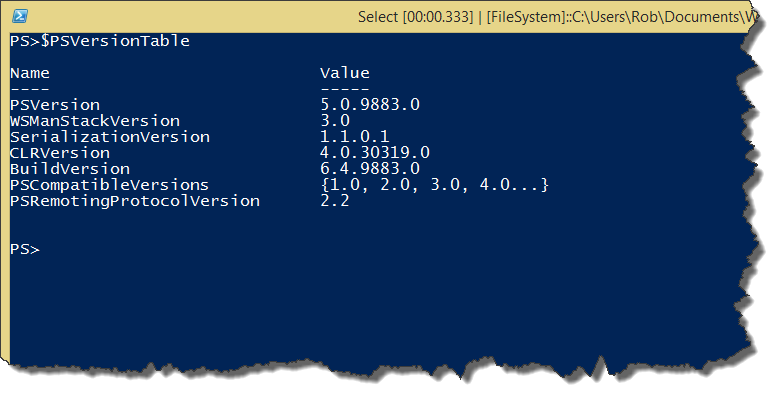
To find out the version of Windows PowerShell installed in your environment run $PSVersionTable which will show all of the details. The most important Name to check is PSVersion, the version below shows 5.0.9883.0 (PowerShell 5.0).
The above information will help to identify the various versions of Windows PowerShell and the packages that can be downloaded and installed. The Pure Storage PowerShell Toolkit requires PowerShell 3.0 because I use the Invoke-RestMethod cmdlet to call the REST APIs that are exposed through our Purity Operating Environment which was introduced in Purity 4.0. So at a minimum to use the toolkit download and install PowerShell 3.0, it does work with PowerShell 4.0 and 5.0.
Once the pre-requisites are installed, we can install the toolkit and begin using with any Pure Storage FlashArray model, FA-405, FA-420 and the FA-450. There are several places to download the toolkit. Our customers can access it from the Pure Storage Community and download from the Tools, Tips & Tricks forum or you can download from the GitHub which is the repository that is directly updated.
After downloading the toolkit run the Windows installer (MSI) and that will take care of creating the PureStoragePowerShell folder and deploying the PSD1 and PSM1 files which contain all of the scripting logic. To check to see if the toolkit was installed there are a few different choices you have:
- Using Program and Features check for PureStoragePowerShell. The below screenshot is an example taken from my Windows 8.1 system.

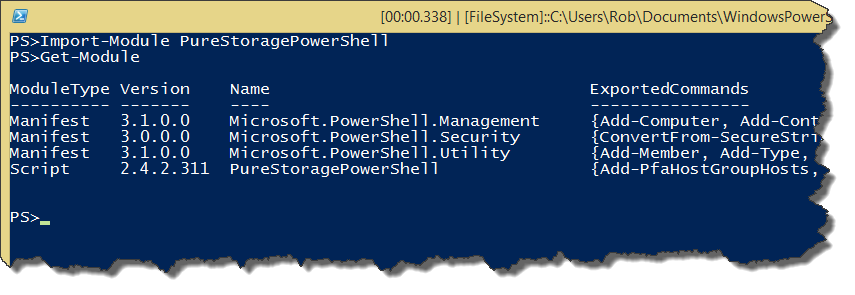
- Or you can use PowerShell. Start a Windows PowerShell session and Import-Module PureStoragePowerShell then Get-Module to see that PureStoragePowerShell is listed. See the below screenshot as an example.
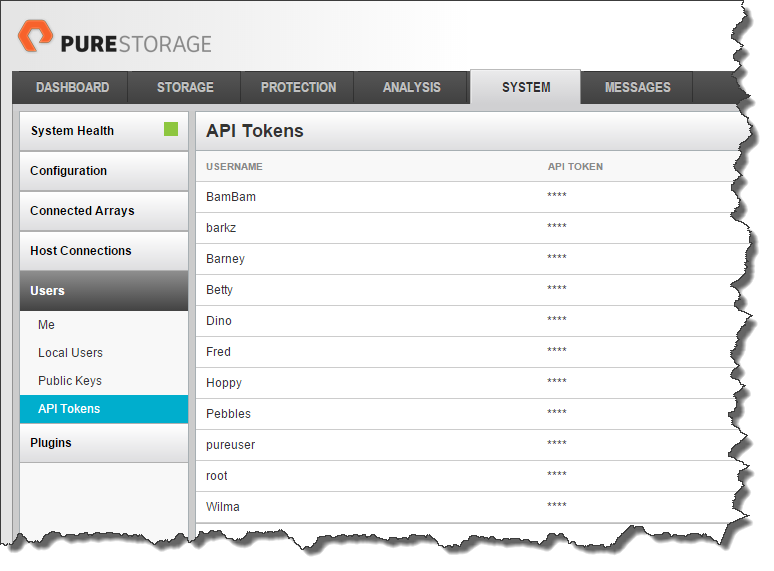
Now the toolkit is installed and ready for use. In order to access our FlashArray an API Token is required to create a REST session. Below is an example taken from my lab array where I have a mixture of usernames, some from Active Directory (AD) and default FlashArray accounts (pureuser and root). If you choose to use our Directory Services integration accounts that are included in any of the three groups (Read Only, Storage Admin and Array Admin) can be added using the Web Management GUI or once you get the toolkit installed with the New-PfaApiToken cmdlet. In order to use the REST API each user requires an API Token. The easiest way to get started is just use the default account pureuser for now.
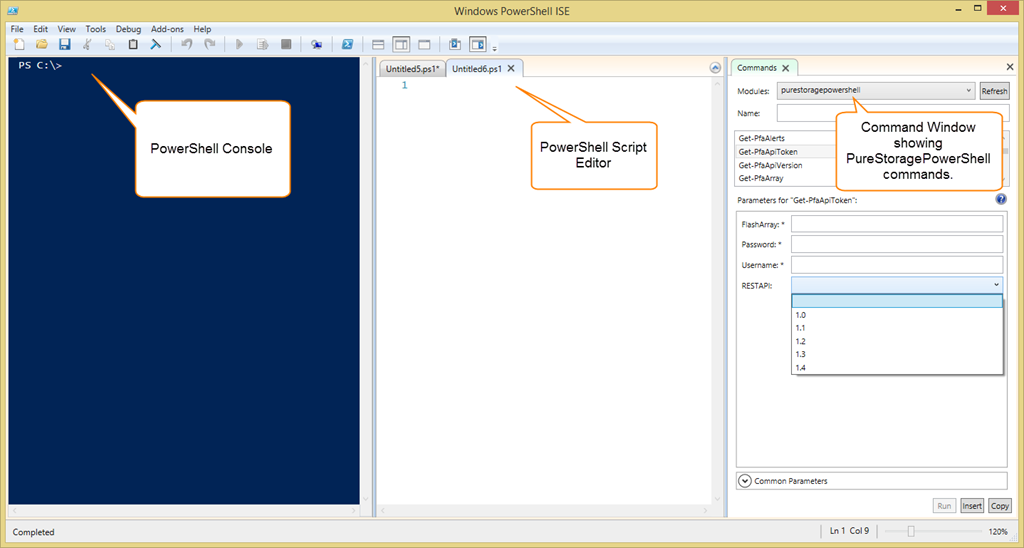
There are a few different methods to working with Windows PowerShell, (1) standard PowerShell session, (2) Windows PowerShell ISE and (3) 3rd party tools. For the work I do, I use a combination of all three mainly for development/testing of the toolkit itself. I highly suggest when you are getting started with any PowerShell module to use Option 2, Windows PowerShell ISE (known here on out as ISE). The ISE provides script editing, debugging and the Commands Window for help with modules/cmdlets. The basic features of ISE are shown in the screenshot below.
Note: Depending on whether you are using a Windows client or Windows Server you will need to do a search for PowerShell_ISE then you can add to your taskbar, Start screen or desktop for quick access.
The Commands Window is very important to call out because it provides a way of viewing the different parameters for individual cmdlets so you can enter them in form fields and then Run/Insert/Copy into a script that you might be developing.
To get started with the PureStoragePowerShell module there are two (2) basic cmdlets that need to be run:
- Get-PfaApiToken
- Connect-PfaController
The Get-PfaApiToken retrieves the API_Token for a given user, in this case we are getting the token for pureuser. This API_Token is assigned to the variable $PureToken. Using the PowerShell Console you can query the $PureToken and see the api_token that has been retrieved.

The next step is to use the api_token to create a connection (or REST session) that we can use to issue any of the supported cmdlets to the Pure Storage FlashArray. In the below screenshot the most important point to call out is that the $PureToken.api_token is used for the API_Token parameter to create the REST session.
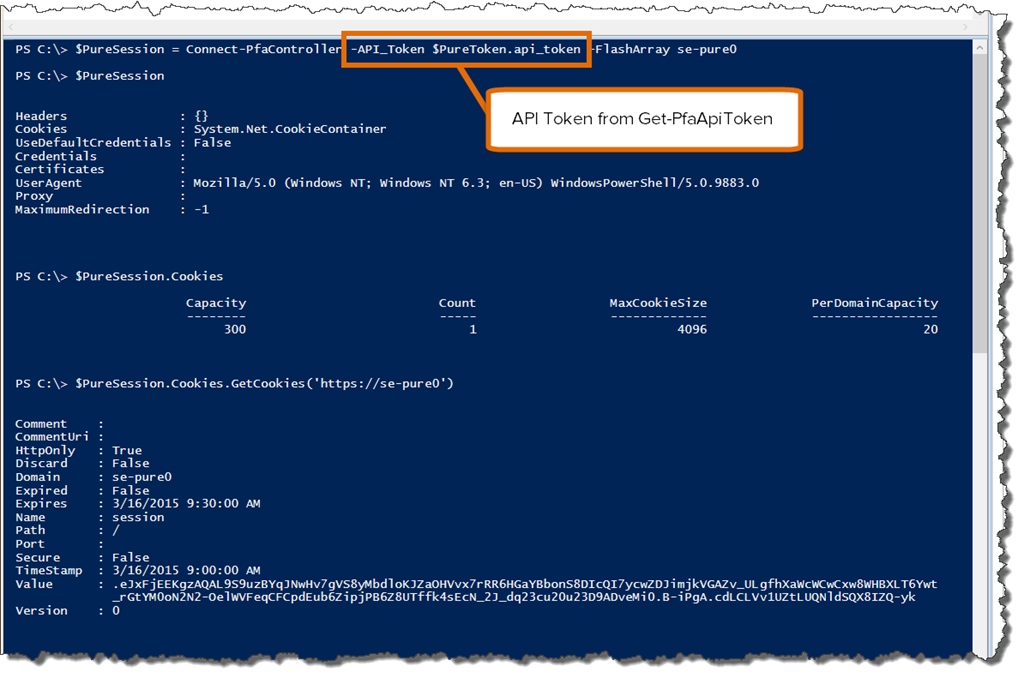
Once the $PureSession has been created it is possible to view the details of the session. It is also possible using the $PureSession.Cookies to see that a CookieContainer has been created. Since we know the URL to the Pure Storage FlashArray (eg. https://se-pure0) we can pass the URL as a URI into the $PureSession.Cookies.GetCookies(‘https://se-pure0’) method to see the details of the CookieContainer. These steps are not required but can be helpful in getting to understand how sessions are managed.
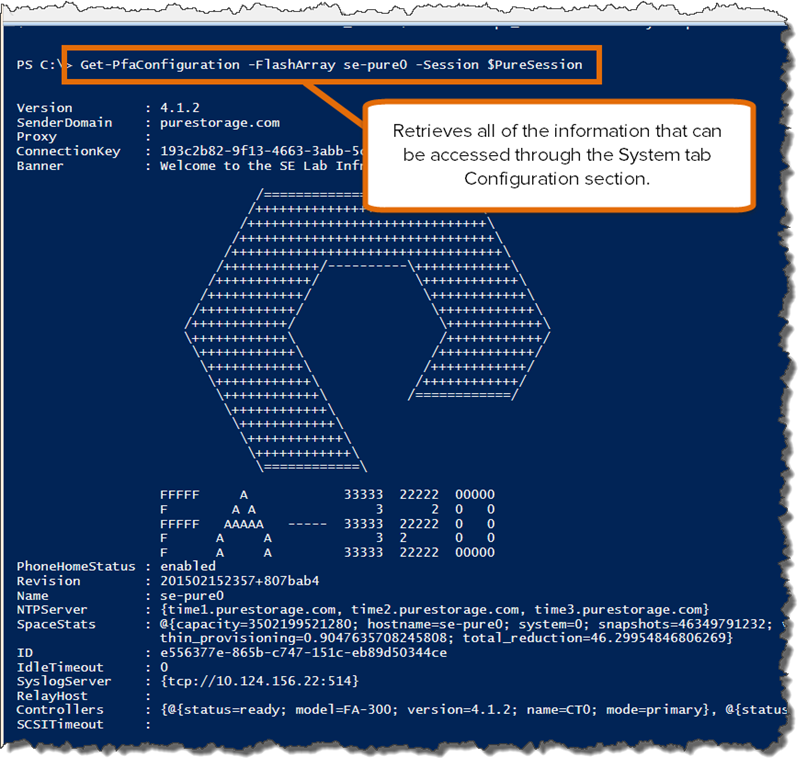
Even though we can see that a CookieContainer exists it is best to validate that there is a REST session established by retrieving some basic FlashArray configuration details using the Get-PfaConfiguration cmdlet.
Video demonstration
Here is the script that was presented in the video:
$T = Get-PfaApiToken -FlashArray se-pure0 -Password pureuser -Username pureuser
$S = Connect-PfaController -FlashArray se-pure0 -API_Token $T.api_token
Get-PfaConfiguration -FlashArray se-pure0 -Session $S
You will notice in the video demonstration that I added a few bonus items towards to end. I am assigning the results from the Get-PfaConfiguration cmdlet to a variable called $MyArray. Then I can use the $MyArray variable to retrieve the various properties. This is useful for when you want to develop more complicated scripts that may rely on certain property values. For example:
If ($MyArray.Name -eq "ARRAY_ONE")
{
    # DO SOMETHING SPECIFIC
}
Else
{
    # DO SOMETHING ELSE
}
So far we have only used three (3) cmdlets that are not that difficult to use based on the required parameters. When developing scripts using the ISE the Commands Window is incredibly helpful to explore all of the various cmdlets provided in the toolkit, there are 155 cmdlets in 2.4.2.311). If you happen to just be using the simpler Windows PowerShell session you can issue the below command to retrieve a list of all the supported cmdlets.
Get-Command –Module PureStoragePowerShell
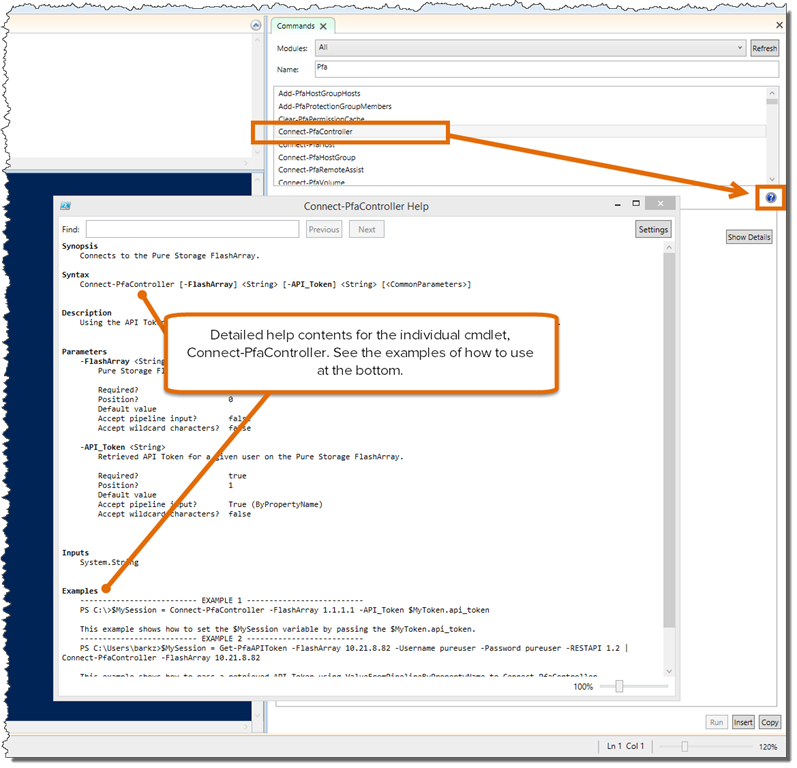
The Commands Window provides a visualization of each cmdlets parameters so using <Tab> to move through each is not necessary. But even though you can visualize each of the parameters it does not necessarily help with the meaning behind each parameter and the type, intended use or examples. To help with that level of detail the toolkit provides detailed help with examples. There are two different ways to access this help.
- Using ISE and the Commands Window
- Using the PowerShell Console with Get-Help
Method #1, using the ISE and the Commands Window, provides access to the same help content that you can access from the PowerShell Console. The below screenshot provides an example of accessing the help for the Connect-PfaController cmdlet.
Method #2, using Get-Help from the PowerShell Console, return the very same results as seen in the ISE Help.

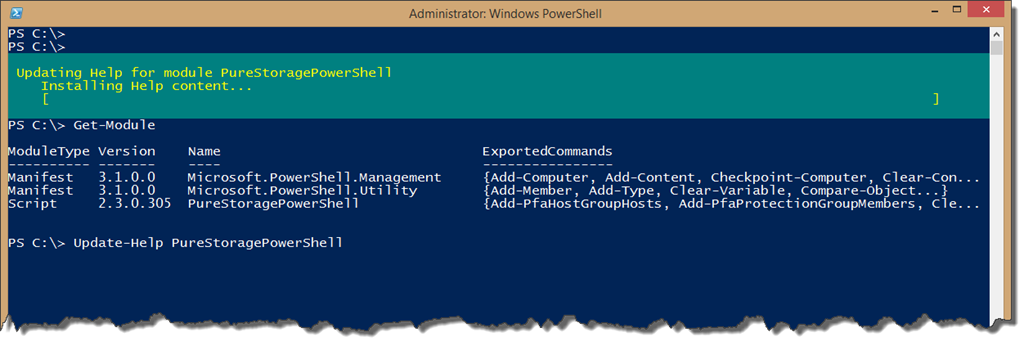
With the release of the 2.3.0.305 version of the toolkit I introduced Update-Help in order to decouple the help content from the functional module. Help is a critical part of the toolkit so updates can be more frequently released. In order get the latest version of the toolkit help open a PowerShell Console with “Run as Administrator.” Running as an administrator is required because there is a folder and files that get added to the PureStoragePowerShell directory. Below is a screenshot example of the Update-Help cmdlet.
At this point we have covered some basic history of PowerShell, installing the toolkit, using the ISE to connect to the FlashArray and updating the toolkit help to the latest version. With those details covered we can start creating some useful scripts. In this next session we will be work with the cmdlets to create hosts, hostgroups, volumes and connect all of the objects for use.
The video will show how to perform the basic steps that cover the following:
- Create a Host with WWNs.
- Create a Hostgroup and add the Host from Step 1.
- Create a two (2) 1TB volumes.
- Connect one 1TB volume to a Host.
- Connect the second 1TB volume to a Hostgroup.
The toolkit cmdlets that map to the individual steps are as follows:
- New-PfaHost
- New-PfaHostgroup
- New-PfaVolume
- Connect-PfaVolume
- Connect-PfaVolume
Let’s take a look at how all of this is done. For this demonstration I will just be using the script editor and not the Commands Window.
Here is the script that was presented in the video:
$FA = '10.21.8.49'
$T = Get-PfaApiToken -FlashArray $FA -Username pureuser -Password pureuser
$S = Connect-PfaController -FlashArray $FA -API_Token $T.api_token
$wwns = @('1122334455667788','2233445566778899')
New-PfaHost -FlashArray $FA -Name QUICKSTART -WWNList $wwns -Session $S
New-PfaHostGroup -FlashArray $FA -Name QUICK-HG -HostList QUICKSTART -Session $S
ForEach($i in 1..10) { New-PfaVolume -FlashArray $FA -Name QUICKSTARTVOL$i -Size 1T -Session $S }
ForEach($a in 1..5) { Connect-PfaHost -FlashArray $FA -Name QUICKSTART -Volume QUICKSTARTVOL$a -Session $S }
ForEach($b in 6..10) { Connect-PfaHostGroup -FlashArray $FA -Name QUICK-HG -Volume QUICKSTARTVOL$b -Session $S }
I hope that this helps both current and new toolkit users or people just getting started using Windows PowerShell.
Helpful References
- Windows PowerShell Scripting – https://technet.microsoft.com/en-us/scriptcenter/powershell.aspx
- Windows PowerShell Users Guide – https://technet.microsoft.com/en-us/library/cc196356.aspx
- Getting Started with Windows PowerShell – https://technet.microsoft.com/library/hh857337.aspx
- Pure Storage PowerShell Toolkit – https://github.com/barkz/PureStoragePowerShellToolkit
- Windows 8 Packages – https://technet.microsoft.com/en-us/library/hh825549.aspx
- Starting Windows PowerShell on Windows 8 and Windows – https://technet.microsoft.com/en-us/library/hh847889.aspx
- PowerShell.org – http://powershell.org/wp/
Thanks,
barkz